HN+
Help

Overview
Content Related


API


Monetization


Integrations
Auto Posting - Bluesky

Auto Posting - Discord
Auto Posting - Ghost

Auto Posting - Mastodon

Auto Posting - Slack

Auto Posting - Teams

Auto Posting - Telegram

Auto Posting - Twitter

Auto Posting - WordPress
Widgets


Other Settings

Analytics

Custom CSS

Custom pages

Domain

Email via custom domain

Making a private site

Newsletter

Roles & Permissions

SEO

Translation
Using your own domain for sending emails
Back to Admin
Using your own domain for sending emails can significantly improve your email deliverability and brand recognition. This feature allows emails sent from your HN+ community to appear as coming from your own domain rather than from our default address.
Requirements
- This feature is available only for paid plans $20/month and above. If you're on a lower tier plan, you'll need to upgrade first.
- You must have already set up your custom domain for your HN+ site. If you haven't done this yet, please follow the instructions here first.
- You need access to your domain's DNS settings through your domain registrar (e.g., GoDaddy, Namecheap, Cloudflare).
Setting up email with your domain
- Go to the Domain Settings section in your admin panel and navigate to the Email tab.
- Toggle the "Enable your own domain for sending emails" option to Yes and save the settings.
- After saving, the system will generate the required DNS records you need to add to your domain.
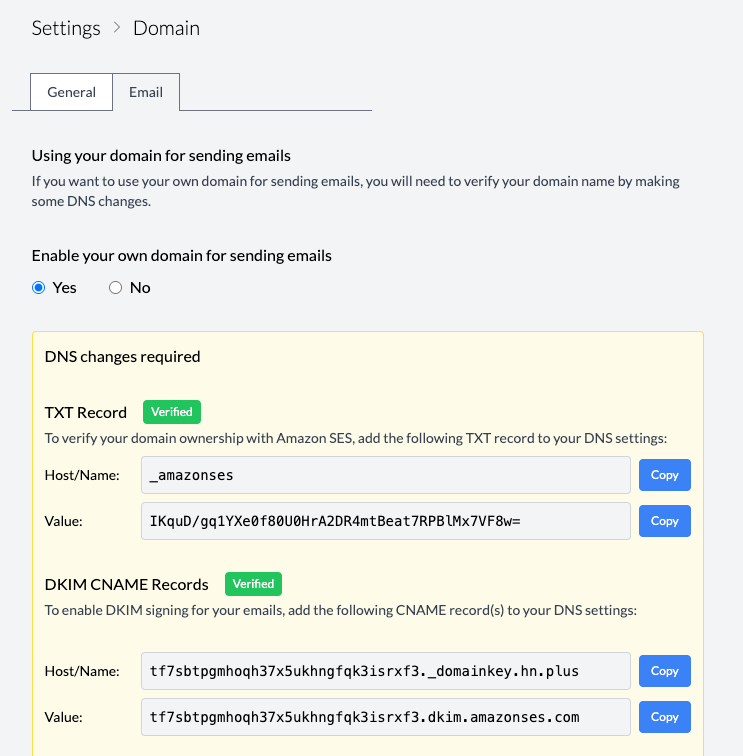
DNS Records to Add
You will need to add two types of DNS records to verify your domain for email sending:
1. TXT Record
This record verifies your domain ownership with Amazon SES (our email service provider). Add the following TXT record to your DNS settings:
Host/Name: _amazonses
Value: A unique verification token (provided in your admin panel)
2. DKIM CNAME Records
DKIM (DomainKeys Identified Mail) helps ensure your emails aren't marked as spam. You'll need to add multiple CNAME records with the following format:
Host/Name: [unique-string]._domainkey.yourdomain.com
Value: [unique-string].dkim.amazonses.com
Your admin panel will show the exact records to add for your specific domain. You'll typically need to add 3 DKIM records.
After adding these DNS records at your domain registrar, the verification process will begin automatically. DNS changes typically take 24-48 hours to propagate, so you may need to wait before the verification completes.
You can check the verification status in your admin panel. Once verified, you'll see green "Verified" indicators next to both the TXT Record and DKIM Records sections.
Frequently Asked Questions
How long does verification take? - DNS changes typically take 24-48 hours to propagate across the internet. Our system automatically checks for verification periodically during this time.
What if verification fails? - Double-check that you've added all the required DNS records exactly as shown in your admin panel. Common issues include typos in the record values or using the wrong record type.
Will this affect emails I receive? - No, this setup only affects emails sent from your HN+ community. It doesn't change your existing email receiving setup.
Does this work with subdomains? - Yes, you can use either your root domain or a subdomain for sending emails. The verification process is the same for both.
